How to Bleed Magura Disc Brakes
Posted by Alex MansellBleeding your Magura brakes isn't considered a necessary routine chore. This is down to the fact that Magura brakes use mineral oil brake fluid as opposed to DOT fluid.
Since mineral oil does not absorb water from the air over time like DOT brake fluid does, the boiling temperature and performance of the fluid will not be affected thus negating the need for an annual bleed of the brake system.
However there are times when a bleed of the system is necessary - after finding (and fixing) a leak, following brake hose shortening or if air is suspected to be present in the brake system, it will need to be bled out to restore full braking performance.
Whatever your reasons for bleeding your brake set, this article will guide you through the process of bleeding your Magura brakes using our Magura disc brake bleed kit.

Magura brakes use mineral oil brake fluid only. Never introduce DOT brake fluid into your Magura brake system. These two fluids are not compatible.
Using the wrong fluid will damage your brake's internal seals and may result in brake failure or premature wear.
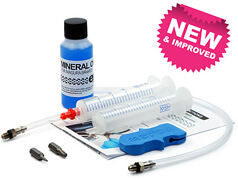
Things you'll need
- Magura Compatible Bleed Kit
- 3mm & 5mm Allen wrench
- 8mm Open-ended spanner
- Bleed block or Magura Transport Device
- Flat blade screwdriver
- Torx T25 key (supplied with bleed kit)
- Elastic band (supplied with bleed kit)
- Paper towels
- Torque wrench (optional)
- Bicycle work stand (optional)
- Safety glasses (Recommended)
Prepare your bleed kit
Start by preparing your bleed syringes.
Take the injection syringe and 3/4 fill it with Mineral Oil by immersing the bleed adaptor in the bottle and pulling back on the syringe plunger.
Invert the syringe, cover the tip of the syringe with a paper towel and push out all of the air from within the syringe and tubing. Tapping the side of the syringe body will help to dislodge any trapped air.

Take the second syringe and remove the plunger. Set the syringes aside for a second, we'll come back to them later.

Step 1
If you have access to a work stand it may be used to make the job easier allowing you to remove the wheel giving you free access to the calliper.
Position your bike in your work stand and depending on which brake you plan to bleed first, remove the front or rear wheel from the bike to access the brake calliper.

If you do not have access to a work stand it will be easier to remove the calliper from the frame during the bleed. Make sure the bike is in a secure, upright position and using a 5mm Allen wrench, remove the two calliper fixing bolts from the fork or frame and set them aside.

You should now be able to slide the brake calliper off of the brake rotor.

Step 2
Before removing the brake pads you will need to reset the position of the pistons. Take your flat blade screwdriver and place it between the brake pads. Without using excess force, use a combination of twisting and levering movements to separate the brake pads which will also push back the pistons.
Be careful not to damage the surface of the brake pads. Only use this method if the brake pads are in place. Never contact the piston faces directly as you may damage them.

Step 3
Remove the brake pad retaining screw using a Torx T25 key and remove the brake pads by pulling them upwards out of the calliper. Set aside in a safe and dry place away from any brake fluid.


Step 4
Insert your bleed block, or the thick end of the Magura transport device, between the calliper pistons and hold in place using an elastic band.


If you do not have the Magura transport device or other suitable bleed block, follow our guide on how to make a bleed block.
Step 5
If you're using a work stand position the bike so that the calliper bleed port is at the highest point on the calliper.
If you've removed the calliper from the bike be sure to hold the calliper in this position whilst injecting mineral oil.
Step 6
Loosen the fixing bolts on the lever assembly slightly so that it moves freely on the handlebar.

Position the lever assembly in the horizontal position (parallel to the ground) and then upwards roughly 1cm. Temporarily fix in this position.
Step 7
Remove the calliper bleed port screw using a 3mm Allen wrench

Now thread in the calliper syringe bleed adaptor until finger tight. Then tighten slightly with a 8mm open ended wrench. Do not over tighten.


Step 8
Unscrew the lever bleed port screw (EBT screw) with a Torx T25 key and place in a safe place.


Push the tip of the empty syringe shell into the EBT bleed port to form a seal.

Step 9
Slowly inject mineral oil using the calliper syringe by pushing down on the plunger until there is 2-3mls left inside the syringe.

Do not inject all of the oil as doing so may introduce air into the brake system.
The oil will begin to enter and fill the lever syringe along with any air bubbles that may have been present in the brake system. If you removed your calliper from the frame remember to orientate the calliper so that the bleed port is at the highest point as you inject the new fluid.

Step 10
Now draw the mineral oil back into the calliper syringe by gently pulling back on the syringe plunger. The level of mineral oil in the lever syringe will start to drop at this time.
Do not let the fluid level drop below 2-3mls in the lever syringe. If the lever syringe runs empty air will be introduced into the master cylinder and will need to be bled out again.

Step 11
Repeat this process of cycling fluid back and forth between the two syringes until no more air bubbles enter either the lever syringe or calliper syringe.
While doing this, operate the brake lever slowly and allow it to snap back into position several times. This will help to dislodge any trapped air bubbles within the master cylinder.

Step 12
When there are no more air bubbles entering either the lever or calliper syringe, draw the mineral oil back into the calliper syringe, again leaving a small amount of oil in the lever syringe.
Place a paper towel around the lever syringe to catch any mineral oil. Disconnect the syringe by twisting and pulling upwards, using your finger to cover the tip of the syringe to trap the remaining oil inside.

The lever bleed port should be filled right to the top with mineral oil. If not, drop a small amount of fluid from the lever syringe into the bleed port until overflowing.

Allow the remaining oil to drain into a suitable container or a paper towel.
Step 13
Refit the lever bleed port screw using your Torx T25 key and torque to 0.5Nm. Wipe away any excess mineral oil with a paper towel.


Step 14
Remove the calliper syringe and bleed adaptor by first loosening with the 8mm open ended wrench. Use your paper towel to catch any drips.

The calliper bleed port should be filled to the top with mineral oil. If not, drop a small amount of oil from the calliper syringe until over flowing.
Refit the calliper bleed port screw with the 3mm Allen wrench and torque to 2.5Nm. Wipe away any excess mineral oil.
Step 15
Remove the elastic band and transport device or bleed block from the calliper. Refit the brake pads and pad retaining screw using your Torx T25 key, making sure that the retaining screw passes between the holes in both pads. Torque to 2.5Nm.

Step 16
Refit the wheel to the bike.
If you removed the calliper from the frame at the beginning of this guide, now is the time to refit it to the frame or fork using the two calliper fixing bolts. Carefully slide the calliper over the disc rotor to align the holes with those on the frame's brake mount. Torque each bolt to 6Nm.
Step 17
Operate the brake lever several times to set the position of the pistons and brake pads against the rotor. This is usually achieved after 2-3 pulls of the lever. The brake lever should now feel firm when operated.
If the brake lever does not feel firm at this time there may still be air present in the brake system and the bleed process will need to be repeated.


Step 18
Carry out a brake test while the bike is at a standstill. Squeeze the brake lever with one or two fingers using normal braking force and hold it at the pressure point.
Hold the lever blade at the pressure point and visually inspect your brake for any leaks at each connection point, including the lever and calliper bleed port screws.
Once you're happy that there are no leaks, reset the lever assembly to its normal riding position and you're ready to go.
Always dispose of used fluid in a responsible manner. Consult your local council website for guidelines or to find your nearest fluid recycling centre.